Showing posts with label bread. Show all posts

Wednesday, May 22, 2013

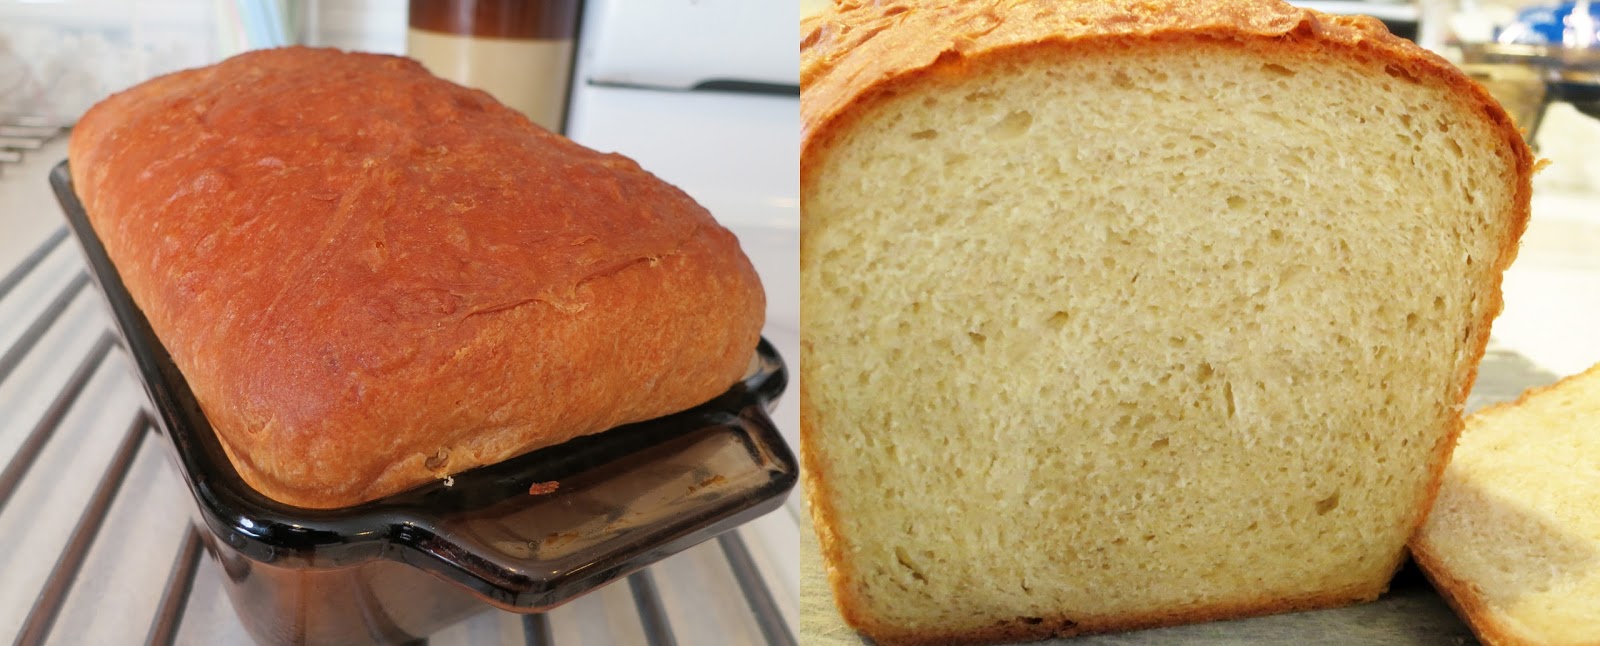
Masa Sandwich Bread

Beyond sandwich bread
Grains of wheat and corn transformed
It's baking magic

Masa Sandwich Bread
Adapted from Baking Illustrated

Ingredients:
1/3 cup tepid water (about 100° - a little warmer than body temp)
1 pkg dry yeast
3 cups unbleached, all-purpose flour + 1-2 tbsp
1/2 cup masa
2 tsp salt
1 1/4 cup milk
3 tbsp honey
3 tbsp butter, melted (plus about 1 tbsp for brushing on the finished loaf)

Directions:
1.  Stir the water and yeast together in a small bowl.  Let sit for five minutes to allow the yeast to bloom.

2.  Combine 3 cups of the flour, the masa, and salt in the bowl of a stand mixer.  Use a wooden spoon to mix.  Make a well in the center.  Set aside.

3.  In a large liquid measuring cup, combine the milk and honey.  Microwave until just warm (110°).  Stir in the 3 tbsp melted butter.

4.  Pour the liquid ingredients and yeast mixture into the dry.  Use the wooden spoon to mix everything together.  Cover and let rest for five minutes (the masa will absorb some of the liquid).

5.  Place the bowl on the mixer with a dough hook.  Turn the machine on medium and let it knead for 5 minutes.

6.  Check the dough.  It should be sticking to the bottom of the bowl, but not the sides.  If it is sticking to the sides, add more flour a tablespoon at a time as needed.  If the dough is not sticking to the bottom, add 1 tbsp more water.  Turn the machine back on medium and let it knead for 5 more minutes.

7.  Knead the dough a few times by hand and form it into a fairly smooth ball.  Place the dough into a lightly oiled bowl (the mixer bowl is perfect).  Lightly oil the top of the dough.  Cover the bowl with plastic wrap and let rise at room temperature for 2 hours or until doubled in size.

8.  Gently press the dough down to expel the air.  Reform the dough into a ball.  Lightly oil the top.  Place the dough back into the bowl, cover, and let rise for another hour or until doubled in size.

9.  You may skip to Step 10 here if you are short on time.  This step provides extra flavor development and improved texture.  Gently press the dough down to expel the air.  Reform the dough into a ball.  Lightly oil the top, cover, and let rise for another hour or until doubled in size.

11.  Grease a 9" X 5" loaf pan.

12.  Gently press the dough down to expel the air.  Press the dough into a rectangle, about an inch thick, and about 8 inches wide, with a short side facing you.  Begin rolling the dough into a cylinder, pressing as you go to avoid air pockets.  Place the cylinder, seam-side down, in the prepared pan.  Lightly oil the top of the dough.  Cover very loosely with plastic wrap.  Let rise for 45 minutes or until doubled in size.

13.  When the dough is almost fully risen, preheat the oven to 350°.

14.  Place 2 cups of water in an empty oven-safe container (a Pyrex loaf pan is perfect).  Microwave the water until simmering.  Carefully place the container of water in the oven.  This will provide steam for the bread as it cooks.

15.  Place the loaf into the oven and bake until it reaches an internal temperature of 195° (about 40-50 minutes).  Remove the bread from the pan and set it on a cooling rack.  Brush the top with melted butter.  Let cool completely.

16.  Slice, serve, & enjoy!

*This bread is terrific all on its own, or toasted with butter.  It also makes an outstanding sandwich!  I made my last loaf into grilled cheese sandwiches using a recipe for DIY American Cheese (which tastes so much better than those slices at the grocery store, but still melts beautifully).  Too good not to share!  Check out the recipe at Brown Eyed Baker.


Thursday, November 17, 2011

Pumpkin Rolls

These rolls are Thanksgiving awesomeness.  They are tender and soft and slightly sweet with subtle autumn flavor.  They're  a wonderful roll to serve with dinner.   And transforming one into a leftover turkey sandwich...well, that would just be perfection.
This recipe is adapted from Technicolor Kitchen.  It is a must-try.


Pumpkin Rolls
Adapted from Technicolor Kitchen

Ingredients:
3/4 cups lukewarm water
1 packet active dry yeast
3 1/4 cups unbleached flour
1/4 cup dry milk powder
3 tbsp brown sugar
1 tsp salt
1/4 tsp pumpkin pie spice
1/2 cup pumpkin
1/4 cup butter, very soft

Directions:
1.  In a small bowl, stir together 1/4 cup of the water and the yeast.  Let sit for five minutes to allow the yeast to bloom.

2.   In the bowl of a stand mixer, stir together 3 cups of the flour, milk powder, brown sugar, salt, and spice.  Add the pumpkin, butter, and remaining 1/2 cup water.  Stir to make a shaggy dough.

3.  Using the dough hook, knead on medium-low speed for 8 minutes.  Watch the dough.  It should be tacky and will stick to the bottom, but should clear the sides of the bowl.  If it is too wet, add more flour a tablespoon at a time (wait for the added flour to be completely incorporated before adding any more).

4.  Gather the dough into a ball.  Place in a lightly oiled bowl (the mixer bowl is perfect), turning to coat.  Let rise in a warm place until doubled in volume - about 1 1/2 - 2 hours.

5.  Line a 9" X 13" baking dish with parchment paper.  Lightly oil the dish & paper.  

6.  Divide the dough into eight equal pieces.  Form each piece into a tight ball.  Place, evenly spaced, in the baking dish.  Lightly spray a piece of plastic wrap with oil.  Place the plastic over the rolls.  Let rise in a warm place until doubled - about 1 hour.

7.  Preheat the oven to 350°.  Bake the rolls until they reach an internal temperature of 195°-200° (about 30 minutes).

7.  Transfer the rolls to a rack to cool.  Serve!

Sunday, October 2, 2011

Beer Buns

You don't get much better than good, fresh, homemade bread.  These buns are soft and perfect - and so wonderfully delicious!
It took me quite a few tries to get these buns the way I wanted them.  So many recipes just taste like homemade white bread - wrong flavor, wrong texture.  Finally, I happened upon a recipe that made the perfect base for my beer buns - a recipe by Dorel at Food.com.
The beer adds a subtle something, but the actual flavor doesn't stand out.  I tried making the buns with Ale, regular Beer, and Hefeweizen, with the latter being the favorite.  This dough can be used to make soft sandwich rolls or hamburger buns, too.  But the hot dog buns are an excellent choice for sausages (with football and Oktoberfest in the air and all).  An ideal match!

Beer Buns
Adapted from Food.com

Ingredients:
3 1/2 - 3 3/4 cups bread flour
1/3 cup powdered milk
1/4 cup sugar
1 tsp salt
1 packet instant yeast
1 1/4 cups beer, room temperature/warm
1/3 cup vegetable/canola oil

Directions:
1.  Combine 3 1/2 cups of the flour, the powdered milk, sugar, salt, and yeast in the bowl of a stand mixer.  Stir to blend.

2.  Add the beer and oil to the dry ingredients.  Stir with a wooden spoon to form a shaggy dough.

3.  Attach the dough hook to the stand mixer.  Mix on medium for 8 minutes or until the dough is smooth, soft, and elastic (may stick to the bottom of the bowl, but should clear the sides).  Add more flour a tablespoon at a time if the dough is too wet.

4.  Form the dough into a ball.  Lightly oil the bowl.  Place the dough in the bowl and lightly oil the top.  Cover the bowl with plastic wrap and set it in a warm place.  Let the dough rise until doubled - about 1 hour (more if the beer was cool).

5.  Gently deflate the dough.  Divide the dough into 12 portions.  Cover and let rest for 10 minutes.

6.  Line a 9" X 13" baking dish with parchment paper.  Placing the dough close together is key - otherwise the buns will be too crusty.  

7.  Flatten each dough ball into a 4.5" X 4.5" square.  Tightly roll the dough.  Place the seam on the bottom.  Flatten the ends and tuck them under.  Gently push the dough with your fingers into a tight cylinder.  Roll the dough gently back and forth a couple of times to seal the seams.  Place the shaped buns into the prepared baking dish.  The buns should be very close together, but not quite touching.

8.  Spray a sheet of plastic wrap with oil.  Cover the baking dish and let the buns rise until doubled (45-60 minutes).

9.  Preheat the oven to 375°.  Remove the plastic from the dish.  Bake for about 15 minutes, or until the buns reach an internal temperature of 190°-200°.

10.  Remove the buns from the oven.  Let them cool in the dish for 5 minutes.  Transfer the buns, on the parchment paper, to a rack to cool completely.

Sunday, September 18, 2011

Chinese Hot Dog Buns

When I saw this recipe, I knew I had to try it.  What a cool way to serve a hot dog!
This recipe is adapted from Return of the Yummy.  I'll need to work on my dough shaping technique a bit, but it's fun, so I look forward to the challenge!
These yummy buns are a fun and delicious way to dress up your favorite hot dogs.  Yum yum!

Chinese Hot Dog Buns
Adapted from Return of the Yummy

Ingredients:
1 package dry yeast
2 tbsp sugar
1/4 cup warm water
2 - 2 1/2 cups flour
1 tsp salt
1/2 cup milk
1 tbsp butter, melted
1 egg

8 hot dogs (I use Oscar Mayer Premium Beef)
1 egg
1 tsp water
Sesame seeds (optional)

Directions:
1.  In a small bowl, stir together the yeast, sugar, and water.  Set aside to bloom for five minutes.  After the five minutes, you should see foam or bubbles at the surface.  If not, your yeast may not be good.

2.  Stir 2 1/4 cups of the flour and salt together in the bowl of a stand mixer.

3.  In a bowl or liquid measuring cup, stir together the milk and butter (this will warm the milk and cool the butter).  Whisk in the egg until everything is well blended.

4.  Mix the wet ingredients and the yeast mixture into the dry ingredients with a wooden spoon.  Stir until the mixture forms a shaggy dough.

6.  Attach the dough hook.  Mix with the hook for eight minutes.  The dough should not stick to the sides of the bowl (it may stick to the bottom).  If it does stick to the sides, add more flour a tablespoonful at a time until the dough is the proper consistency.  The final dough should be soft, but not sticky.

7.  Place the dough ball in a lightly oiled bowl, turn once to oil the top, and cover with plastic wrap.  Set the bowl in a warm place to rise until doubled, about an hour and a half.

8.  Divide the dough into eight equal portions (about 3 oz each - using a scale is very helpful).

9.  Line a baking sheet with parchment paper.  Work with one piece of dough at a time, keeping the others covered to prevent drying.

For the twisty bun, roll the dough into a log about twice the length of your hot dog, tapering the ends slightly.  Begin on one end of the dog, and twist.  You need to made three loops of dough over the dog.  Tuck the tapered ends under the hot dog.

For the braided bun, roll the dough into a rectangle with the long side equaling the length of your hot dog.  Dry a hot dog with a paper towel.  Place the hot dog in the center of the dough.  Cut strips into each long side of the dough (either side of the dog).  Four strips will make a nice wide braid.  Eight strips will give a detailed braid.  Cut an equal number of strips (4-8) per side.  Fold the strips, alternating left then right, over the dog.

10.  Place the bunned hot dogs onto prepared baking sheet.  Spray or brush them lightly with oil. Cover the sheet lightly with plastic wrap.

11.  Let the buns rise until doubled, about an hour.

12.  Preheat the oven to 400°.

13.  In a small bowl, beat the egg together with the water.  Brush the egg wash very gently onto the buns.  This will make them turn out golden and shiny (the ones in the photo were washed with egg yolk and water only due to allergies, hence the lack of shine).  If you'd like, sprinkle sesame seeds over the egg wash.

14.  Bake the buns for 8 minutes.  Reduce the heat to 350°.  Bake for an additional 5-8 minutes or until golden.  Serve (they are very hot - letting them cool for 5 minutes is probably a good idea)!

Monday, August 15, 2011

Quick French Baguette

My favorite French bread recipe by far is the one by Cook's Illustrated.  The flavor and texture are incomparable.  But, it requires more than a full 24 hours of prep work and rising and baking time.  The results are totally worth the effort and the wait, but sometimes you just don't have that much time.  Sometimes you need a loaf for dinner tonight.
Well, when that happens, I have a backup recipe.  It's quick and easy and yields a really tasty bread.  This recipe is adapted from one by Jane Smiley on epicurious.


Quick French Baguette
Adapted from epicurious

Ingredients:
2 tsp (1 packet) active dry yeast
1 2/3 cups warm water (110° - 115°)
4 cups unbleached flour (plus extra for dusting)
1 1/2 tsp salt
1 tsp white vinegar
Olive oil

Directions:
1.  Stir the yeast and 1/3 cup of the water together in a small bowl.  Let stand for five minutes to allow the yeast to bloom.

2.  Meanwhile, pulse the flour, salt, and vinegar together in the bowl of a food processor.

3.  Pour the yeast mixture over the dry ingredients.  Add 1 1/4 cups of the remaining water.

4.  Pulse to combine the ingredients.  Process until the mixture forms a ball and pulls away from the sides of the bowl.  The dough should be very soft and slightly sticky (but not so sticky that you cannot remove it from the bowl).  If the dough is too dry, add up to 2 tbsp more water to reach the proper consistency.

5.  Oil a large bowl with olive oil.  Transfer the dough to the bowl.  Turn to coat.  Cover and let rise until doubled in volume - about an hour.

6.  Line two baking sheets with parchment paper (alternately, you can use baguette pans).

7.  Gently press to deflate the dough.  Divide the dough in half.  Keep one piece covered while working on the other.  

8.  Roll the piece of dough into an 8" X 10" rectangle.  Fold the two shorter sides in to meet in the middle.  Pinch the edges together and turn the dough seam-side down.  Roll and stretch to form a 15" cylinder.

9.  Place the dough diagonally on the baking sheet, seam-side down.  Spray or brush with oil.  Let rise, uncovered, for 30 minutes.  Repeat Steps 7-9 for the second piece of dough.

10.  Move one oven rack to the bottom and one to the upper third of the oven.  Put a baking dish or roasting pan with about one inch of hot water (heated to boiling is preferable) on the lower rack.  Preheat the oven to 450°.  Water needs to be steaming before you bake the bread.

11.  With a razor or very sharp knife, make three diagonal cuts in the top each loaf.

12.  Optional: mist the loaves lightly with water (using a clean spray bottle).

13.  Bake the loaves (one at a time if your oven cannot accommodate both baking sheets on the top rack) until they reach an internal temperature of 208°.

14.  Transfer loaves to a rack to cool.  Serve!

Friday, August 12, 2011

Texas Toast

Texas Toast is one of those foods that's often misunderstood.  "Texas Toast" actually refers to a type of bread - thick cut white (about 1" slices).  This type of bread can be used for French Toast, sandwiches, or a recipe like the one we have here.
Texas Toast, as I think the term is most generally used, is a buttered toast that is often served as a side dish.  Authentically, it is fried - much like French Toast.  Sometimes it is fried in a pan that was used to fry meat (like steak or bacon), so that the bread absorbs the flavor (which might not sound great, but trust me - really is).
There are, of course, many variations.  Some people add things like herbs, seasoning salt, cheeses, and other toppings.  Some people bake, broil, or grill the bread instead of frying it.  I wanted to keep my recipe more true.  I did add just a bit of garlic, for flavor in lieu of the meat juices.
So, add or omit whatever you'd like, use whatever method you want to cook it, but however you slice it - Texas Toast is super good!

Texas Toast
Katie Christy

Ingredients:
1/2 cup (1 stick) butter, softened
1 tsp minced garlic
1/8 tsp ground black pepper
8-10 thick slices of white bread (French or Italian are fine, too)

Directions:
1.  Place the butter, garlic, and black pepper in the small bowl of a food processor.  Process until smooth.  Alternately, microwave the butter until extremely soft, but not melted.  Stir together with the garlic and black pepper.  Place the butter in a small bowl, cover, and chill if not using right away.

2.  Spread butter mixture on both sides of each slice of bread.

3.  Place a large skillet over medium heat (using a griddle works great, too).  Once hot, place as many slices of bread in the pan as will fit without touching.

4.  When the first sides of the bread are golden, flip.  When the second sides are golden, remove and serve!

Friday, July 29, 2011

Petits Pains: French Bread Rolls

I love, love, love bread.  It is clearly one of the greatest cooking achievements ever made.  I've been intrigued since I was a little girl - in fact, making bread is one of my first cooking memories.  
When I happened upon a recipe, by Jocatlin, at allrecipes.com for French Bread Rolls, I immediately wanted to try it.  It's not that I've never made French breads before, just that I'm always looking for a great new one!
This one is really good - tasty, smells great, right amount of chew.  Lovely!  Plus, it was really quick and easy.  So, next time you want some wonderful fresh bread - why not make it yourself?  These rolls are definitely better than anything you're going to get at the supermarket!  Yummy!

Petits Pains
Adapted from Jocatlin at All Recipes

Ingredients:
1 1/2 cups water, warm (110°)
2 tbsp sugar
1 tbsp active dry yeast
4 cups bread flour
1 tsp salt
2 tbsp vegetable oil

Directions:
1.  Place 1/4 cup of the water in a small bowl.  Gently stir in the sugar and yeast.  Let the yeast bloom for five minutes.

2.  In a the bowl of a food processor, stir 2 cups of the flour together with the salt using a wooden spoon.  Add the vegetable oil, yeast mixture, and remaining 1 1/4 cups water.

3.  Stir rapidly with the wooden spoon (or use the paddle attachment) until the mixture is completely smooth.

4.  Add 1 1/2 cups of the remaining flour.  Stir with the wooden spoon to form a shaggy dough.

5.  Using the dough hook, knead the dough in the mixer for 5 minutes or until smooth and elastic.  As the dough kneads, add more of the remaining flour a little at a time, if it is at all sticky (I ended up using 3 1/4 cups flour total).

6.  Form the dough into a ball.  Lightly oil the bowl.  Place the dough upside down in the bowl and turn to coat.  Cover the bowl tightly with plastic wrap.  Let rise in a warm place for about 1 1/2 hours or until doubled in size.

7.  Line a baking sheet with parchment paper.

8.  Gently flatten the dough.  Cut it into 16 equal pieces.  Roll each piece into a ball.  Place each ball on the baking sheet, evenly spaced.  Cover the baking sheet loosely with a damp cloth.  Let rise in a warm place for about 45-60 minutes or until the balls have doubled in size.

9.  Preheat the oven to 400°.

10.  Remove the cloth from the bread.  Bake for 15-20 minutes or until the rolls reach an internal temperature of 200° - 210°.

11.  Transfer the rolls to a rack to cool.  Serve!

*Note: the original recipe suggests using a egg wash for a shiny crust (1 egg white beaten with 1 tbsp water, brushed on just before baking).  I didn't use the glaze for allergy reasons, but recommend it!  The effort is minimal and the outcome beautiful!

Monday, July 18, 2011

Garlic French Bread

Who doesn't love a good garlic French bread?  Perfect with pasta, salad, or all by itself.  It's simple, easy, delicious.  This recipe is my seasoning blend.

Garlic French Bread Seasoning
Katie Christy

Ingredients:
2 tbsp grated Parmesan
1/2 tsp garlic powder
1/2 tsp dried basil
1/2 tsp dried oregano
1/2 tsp dried parsley
1/4 tsp salt

Directions:
1.  Mix all ingredients together in a small bowl.  To store: cover and chill.

Garlic French Bread Recipes

1 batch Garlic French Bread Seasoning
1 loaf sliced French Bread

Recipe #1 - Garlic Toast:

Preheat the broiler.  Brush or spray one side of each bread slice with olive oil or melted butter.  Sprinkle the seasoning evenly over the slices.  Broil, seasoned sides up, until golden brown.  Serve.

Recipe #2 - Garlic Cheese Toast:

Preheat the broiler.  Brush or spray one side of each bread slice with olive oil or melted butter.  Sprinkle the seasoning evenly over the slices.  Broil, seasoned sides up, until very light golden.  Remove the bread from the oven.  Sprinkle with shredded cheese (mozzarella, cheddar, colby, or provolone work well).  Be sure not to add too much cheese or the bread will be greasy.  Return to the broiler.  Broil until the cheese is bubbly.  Serve.

Recipe #3 - Garlic Loaf:

Preheat the oven to 350°.  Spread one side of each slice with softened butter.  Sprinkle the seasoning evenly over each slice.  Wrap the loaf in parchment paper.  Wrap the parchment paper with aluminum foil, crimping the foil to enclose the contents.  Bake for 15 minutes.  Serve.

Related Posts Plugin for WordPress, Blogger...